Connect a subdomain
A subdomain such as blog.example.com is the simplest way to put your blog on your own domain. Your main website is not touched. The same steps work for a root domain such as example.com.
Add the DNS records
- In Custom Domain, enter your subdomain and click Connect Domain.
- The dashboard shows the DNS records to add: their Name, Type and Value. Each has a copy button.
- Sign in to the company that manages your domain's DNS, such as GoDaddy, Namecheap or Cloudflare, and add each record exactly as shown. TTL does not matter.
- Back in the dashboard, click Refresh Status.
- When the status is Active, deploy.
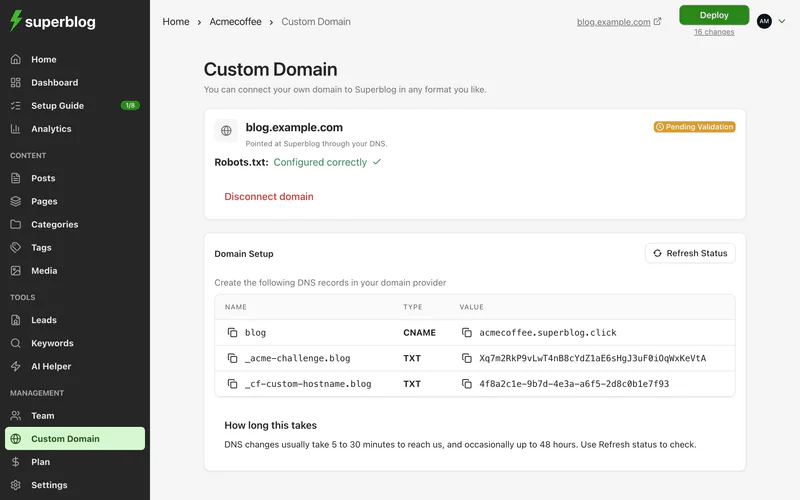
Use the copy buttons rather than typing the values. TXT values must match exactly, including uppercase and lowercase letters.
When you connect a root domain, the dashboard also shows Copy instructions for AI below the records. It copies the steps with your own values filled in, ready to paste into ChatGPT, Claude or another assistant.
How long it takes
DNS changes usually reach Superblog in 5 to 30 minutes, and occasionally take up to 48 hours. Superblog then issues the security (SSL) certificate for your domain. You do not need to buy one.
See DNS propagation to speed this up.
Root domains and CNAME records
A root domain such as example.com needs a CNAME record named @. Some providers, such as GoDaddy, Namecheap and Hostinger, do not allow one. If yours does not, move your domain's DNS to Cloudflare's free plan. Your domain stays registered where it is: only the DNS moves.